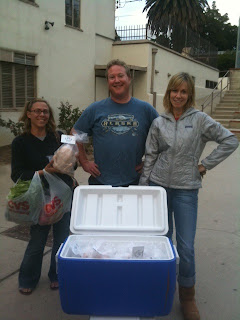
Friday, November 25, 2011

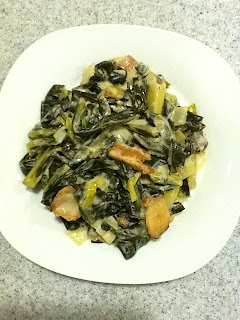
Creamed Collards


I hope everyone had a delightful Thanksgiving feasting with family and friends. I'm still in a thrall over the myriad tastes and treats that were part of my Thanksgiving meal.

My dear friend, John Barrentine, is the best non-professional cook I know. He made a collard dish that was so luxuriously delicious; when I saw collards in today's box, I knew I had to share this recipe.

Turns out, it's a recipe that appeared in this month's issue of Bon Appetit. Of course, John enhanced it a little with a few additions of his own. I'm not sure there is any higher calling for collards than this luscious and creamy dish.

1 bunch collard greens, center stems removed and cut into 1/2" strips
1/4 C cider vinegar
1 t vegetable oil
1/2 C thick-cut smoked bacon, cut into 1/3# pieces
1 shallot, finely chopped
1 leek, finely chopped
1 T + 1 t flour
1 t smoked paprika (or to taste)
3/4 C whole milk
3/4 C heavy cream
salt and pepper

1. Blanch the chopped collards in a large pot of boiling salted water with 1/4 C cider vinegar until bright green and beginning to soften, about 3-4 minutes.

2. Heat the oil in a large pot over medium heat. Add the chopped bacon and cook untiol crisp. Transfer the bacon to a paper towel, reserving the rendered bacon fat.

3. Remove all but 1 T bacon fat and save the rest for another use.

4. Over medium heat, add the chopped shallot and leek to the bacon fat and cook until soft, about 5 minutes.

5. Add the flour and the smoked paprika. Stir constantly for 2 minutes.

6. Whisk in the milk and cream and bring to a soft boil, whisking often.

7. Stir in the blanched greens. Reduce the heat to a simmer and cook, stirring often, until the greens are tender and the sauce thickens, about 30 minutes.

8. Season with salt and lots of pepper. Garnish with the bacon before serving.

Vegetarians may omit the bacon and use vegetable oil instead.

Today's bounty included:

From Underwood Family Farms: colored cauliflower, red leaf lettuce, orange carrots, Easter radishes, spinach, red bell pepper, celery, Satsuma tangerines, and Fuji apples;

From Sage Mountain Farms: baby Torpedo spring onions, collard greens, and acorn squash;

And from Silver Lake Farms: fresh herbs.

Enjoy!

Shelley

Friday, November 18, 2011

Spiced Butternut Squash with Apples


Thanksgiving is coming. It's next week. If you haven't already done so, it's time to start planning your Thanksgiving table. Here's a super easy and delicious alternative to candied sweet potatoes that uses two fall favorites: butternut squash and apples.

1 butternut squash
3-4 apples
1/2 C brown sugar
1 T flour
1/2 t salt, or to taste
1/2 t cinnamon
1/2 t nutmeg
4 T cold butter + extra to butter the pan

1. Preheat oven to 350 F degrees. Butter a 2-3 qt baking dish and set aside.

2. Cut the squash in half lengthwise. Scoop out the seeds and put them in the compost, or feed them to the chickens. Peel and slice the squash crosswise into 1/4-inch slices. Put in a large bowl

3. Cut the apples in quarters lengthwise. Remove the cores and peel. Compost the peels and cores. Cut each quarter into 3 or 4 slices lengthwise. Add to the bowl. Stir the apples and squash to evenly distribute.

4. In a separate small bowl, mix together the brown sugar, flour, salt and spices until well combined.

5. Chop the cold butter into 6-8 pieces and cut the butter into the sugar and spice mixture with a folk or pastry blender until the mixture resembles coarse crumbles.

6. Pour the peeled and sliced squash and apples into the buttered baking dish. Sprinkle the crumb mixture on top. Cover tightly with foil. Bake at 350 F for 60 minutes or until squash is tender. Remove the foil carefully as steam has built up inside and cool at least 2-3 minutes before serving.

This dish makes its own lovely sweet sauce. In fact, this dish is so sweet you might want to serve it for dessert. No kidding. Serve it hot with vanilla or cinnamon ice cream; or serve room temperature or cold with a dollop of whipped cream.

It was a wow week at the CSA. What a bounty! Today's box included:


From Underwood Family Farms: iceberg lettuce, romaine lettuce, purple kale, fennel, red beets, French Breakfast radishes, purple carrots, mizuna, bok choy, Napa cabbage, kohlrabi, and butternut squash;


From Sage Mountain Farm: collard greens, summer squash, arugula, winter squash, and green heirloom tomatoes;


From Weiser Family Farms: golden beets, watermelon radishes, orange carrots, German Butterball potatoes, DeCiccio broccoli, dried Dragon Tongue beans, and purple cauliflower;

From Rancho Santa Cecilia: Hass avocados and Satsuma mandarins;

And from Silver Lake Farms: bunch fresh herbs; Meyer lemons and Swiss Chard from the Dempsey's Tin House Farm.


Plus extras: Thai Guavas and some sapote. Thank you Shareholder Brian for picking and sharing from your trees.

If you're wondering what to do with kohlrabi, check out the blog post from March 19, 2010 on Minty Kohlrabi Slaw.

Enjoy! Happy Thanksgiving to All!

Shelley

Purple caulis from Weiser Family Farm, and pictured below that, Shareholder Brian's Thai Guavas

Friday, November 11, 2011

Roasted Cauliflower Dip


I love cauliflower and I'm always looking for new and interesting ways to prepare it. This dip is my adaptation of a recipe I saw on the Food & Wine website. The recipe calls for slicing and roasting the cauliflower with ginger, salt and coriander. The roasted cauliflower was so delicious when I took it out of the oven, it would make a wonderful dish just like that. So if you're looking for a hot cauliflower side dish, just follow this recipe until you take the cauliflower out of the oven.

Making the dip requires just a few more steps, but you'll be rewarded with a delicious and distinctively different dip.

1 large cauliflower
3-4 T vegetable oil
2 T grated fresh ginger
1 T ground coriander
salt and pepper to taste
3-4 tahini (sesame paste)
3 T fresh-squezed lemon juice
3 T toasted sesame seeds, or to taste
1/4 C plain yogurt
finely chopped fresh cilantro to taste

1. Preheat oven to 425 degrees.

2. Trim the leaves and tough stem off the cauliflower and compost them.

3. Cut the caulflower in half and cut each half into 1/2" slices. Place the sliced cauliflower in a large bowl. Toss with the oil, ginger, coriander, salt, and pepper.

4. Spread the cauliflower on a baking sheet and roast until tender and lightly browned in spots. [Stop here for a wonderful side dish.] Remove from the oven and cool slightly.

5. Transfer the cooled cauliflower to a food processor and process to a chucky puree. Add the tahini and lemon juice and process until just incorporated.

6. Transfer mixture to a bowl. Stir in the yogurt, sesame seeds, and cilantro. Adjust the salt, if necessary. Chill before serving. This dip is great with pita chips.

My New Frontier Family Farm chicken is roasting in my oven right now and the aroma is delicious. It was a beautiful bird to prepare; lovely taut skin, pretty pink color, and a very fresh smell. I simply rubbed my bird with olive oil, seasoned it with lots of salt and pepper and some smashed fresh garlic. I cut up half a lemon and stuffed it in its cavity, and I sliced half a brown onion and scatter the slices inside and outside the bird. I can't wait to eat it.

Today's bounty included:

From Underwood Family Farms: Artichokes, acorn squash, green leaf lettuce, broccoflower, cauliflower, Japanese turnips, red bell pepper, yellow carrots, and Fuyu persimmons.

From Weiser Family Farms: white carrots, beets, German Butterball potatoes, and Dragon Tongue beans.

From Sage Mountain Farm: arugula, summer squash, Red Kuri squash, spaghetti squash, and collard greens.

And from Rancho Santa Cecilia: Hachiya persimmons and Satsuma mandarins.

Enjoy!

Shelley

Friday, November 4, 2011

Green Bean Casserole


Thanksgiving is less than three weeks away; and if you're thinking about how you might make green bean casserole - that Thanksgiving staple - healthier and fresher, then today's recipe is for you.

Green bean casserole is a traditional dish on many Thanksgiving tables. It's usually made with canned or frozen string beans, cream of mushroom soup, and canned fried onions. With just a little extra effort, you can made a healthier version from scratch with all of the creamy delicious-ness of original version.

Start with the Blue Lake string beans in today's CSA box, add fresh mushrooms, make a quick cream sauce, and use fresh, sliced onions to make your own tastier and healthier fried onions. And since you're starting from scratch, you can adjust the ingredients to your taste.

Prep the Beans: Trim the string beans and cut them into bite-sized pieces if you wish. Blanch them in a pot of boiling water or steam them for about 2-3 minutes, or until tender. Drain and set aside.

Thinly slice fresh mushrooms and saute them in a little bit of butter or olive oil. I like to throw in some sliced shiitake mushrooms for added flavor. Covering the mushrooms while they're sauteing over low to medium heat will prevent them from sticking to the pan, as the water they exude will not evaporate. Once the mushrooms are cooked, remove the cover and cook off the liquid, or pour it off and set it aside to use in your sauce.

I'm being vague about the amounts of beans and mushrooms on purpose. I tend to go heavy on the mushrooms, but you can adjust the proportion of beans to mushrooms to suit your taste. The amount of sauce you need depends on the volume of cooked beans and mushrooms combined. For a 1 qt casserole, you'll need 4 C of cooked beans and mushrooms. For a 2 qt casserole, you'll need 8 C.

While the beans and mushrooms are cooking, make the crispy fried onions by slicing 1 large onion in quarters lengthwise, then very thinly slice each quarter crosswise. In a large skillet, heat 1-2 t olive oil over medium high heat. Add the onions and stir to break apart the rings. Use a skillet that's large enough for the onions to be spread thinly on the bottom or work in batches. Cook the onions until they get crispy and brown, stirring occasionally. Set aside.

You need about 2 C of white sauce for a 1 qt casserole or 4 C of white sauce for a 2 qt casserole. Make your favorite white sauce or use this simple recipe:

Melt 2 T butter over medium low heat in a small saucepan. Stir in 2 T flour, 1 T at a time, and cook, stirring constantly for 1 minute. Whisk in 2 C hot milk, 1/2 C at a time, whisking constantly to prevent lumps and sticking. Add salt and pepper to taste. A little nutmeg is also good. Cook over medium low heat, whisking constantly until the sauce just starts to boil. Remove from the heat. Double this recipe for a 2 qt casserole.

Canned condensed milk makes a particularly creamy sauce. Whole milk is also good.

Now you can assemble the casserole: Put the beans and mushrooms in a large bowl. Pour the white sauce over them and stir to coat. Adjust the seasoning, if necessary and pour into a greased casserole dish. Spread your crispy fried onions on top and bake in a preheated 375 F degree oven for 20-30 minutes until the sauce is bubbling and the top is brown. Let sit for 5 minutes before serving.

You can blanch and freeze the Blue Lake beans you got in today's box to use on Thanksgiving. You can prepare the different elements of this recipe the day before Thanksgiving. Defrost the beans, cook up the mushrooms, stir them together and store them in the refrigerator. Make the crispy fried onions and the white sauce. You can leave the onions in a covered container on the counter but refrigerate the white sauce. On Thanksgiving day, follow the steps in the paragraph above on assembling the casserole. You may have to cook it a little longer if all the ingredients are cold when you put it in the oven.

Today's bounty included:

From Underwood Family Farms: Tatsoi, bok choy, celery, Blue Lake beans, red leaf lettuce, fennel, French Breakfast radishes, summer squash, bi-color corn, kale, arugula, broccoli, and Cherokee tomatoes

From Weiser Family Farms: Kabocha squash, golden beets, German Butterball potatoes, and dried Dragon Tongue beans

From Rancho Santa Cecilia: Hass avocados, limes and Satsuma mandarins

From Silver Lake Farms: arugula, basil, and cilantro microgreens and thyme

Enjoy!

Shelley

Friday, October 28, 2011

Butternut Squash and Mixed Bean Salad


Butternut squash is a beautiful and delicious vegetable. With bright orange flesh, a lighty starchy texture, and remarkably sweet flavor, this great fall vegetable can be used in so many ways. Butternut squash is a terrific roasting vegetable. Just cut in half lengthwise, scoop out the seeds, brush the cut side with oil, and roast, cut side down, on a baking sheet at 350 F until tender.

From here you can scoop the pulp out of its skin and mash it with a little butter for a side dish that's particularly tasty with roast pork or fowl. Roasted butternut squash makes a rich and flavorful soup (see recipe from October 15, 2010). I like to peel, seed, and slice butternut squash before throwing it into a stir-fry.

For today's recipe, butternut squash is peeled, seeded, cubed and roasted until tender before tossing into a salad of mixed legumes. Cubed and roasted butternut squash is a lovely side dish all by itself. However, you can take these golden morsels and mix them with a variety of vegetables to make many wonderful combinations.

I used kidney beans, edamame, and garbanzo beans, but you can use whatever combination of legumes you like. I tossed the roasted squash cubes with the beans and added chopped red onion, green onion, parsley, and fennel. I made a light vinaigrette and tossed in some finely grated orange peel to jazz it up.

Here's the recipe:

2 C peeled and cubed butternut squash, approx 3/4" cubes
2 C kidney beans, canned or prepared from dry beans
2 C shelled edamame, prepared per directions
2 C garbanzo beans, canned or prepared from dry beans
1/4 C finely chopped red onion
2-3 green onions, finely chopped
1/2 C very finely sliced fresh fennel (or more to taste)
salt and pepper to taste
3-4 T olive oil
3-4 T rice vinegar
1 t finely grated orange rind
1-2 T fresh squeezed orange juice (optional)

1. To prepare the squash: Cut in half lengthwise, scoop out and compost the seeds, cut crosswise into 3/4" slices, trim off the peel and cut slices into 3/4" cubes to make 2 C. Toss with a little olive oil. Sprinkle on a little salt. Roast in a pre-heated 350 degree oven until just tender, about 30 minutes. Set aside to cool.

2. If you're using dried beans, prepare them according to directions (usually soaking overnight and boiling for about an hour) before measuring them and proceeding with this recipe. Canned beans are fine for this recipe. Rinse them before adding them to the bowl.

3. Toss the cooled squash cubes together with the kidney beans, edamame, and garbanzos in a large bowl. Stir in the red onion, green onions, and fennel. Season with salt and pepper to taste.

4. In a separate small bowl, whisk together the oil and vinegar until combined. Pour over the salad. Add the grated orange rind and juice and toss until all the vegetables are coated with the dressing. Adjust the seasoning. Chill until you're ready to serve.

This recipe makes a lot of salad. You can cut the amounts in half to make a smaller salad.

Even if you make the full recipe of this salad, you're likely to have some unused butternut squash leftover. If you're feeling a little adventurous, you might consider making Sweet Winter Squash Pickles and canning them, like I did in my Master Food Preserver course last Tuesday evening.


Since September, I've been enrolled in a 12-week Master Food Preserver training program through the University of California Cooperative Extension; and I'm having a great time! We've been learning all kinds of food preservation methods, including canning, pressure canning, pickling, drying, fermenting, cheese-making and we haven't even gotten to freezing and charcuterie yet.

If you're familiar with hot water bath canning, you should have no trouble following this recipe. You'll also need more butternut squash, but that's easy to come by at this time of year. Just check out your local farmer's market. If you don't have a canner, you can still make the pickles, but you'll have to keep them in the fridge as opposed to on the shelf.

Sweet Winter Squash Pickles

2 cinnamon sticks
12 whole allspice berries
10 whole cloves
zest and juice of 1 lemon
6 C granulated sugar
4 C distilled vinegar
24 C peeled, seeded, and cubed butternut squash (3/4" cubes)

Yield: About six 16-oz jars

1. Prepare a sachet with the cinnamon sticks, allspice and cloves. Set aside.

2. In a large stainless steel saucepan, combine the vinegar, lemon juice, zest, sugar and spice sachet. Bring to a boil over medium heat, stirring occasionally. Cover, reduce heat and simmer for 10 minutes. Add the squash, return to a boil and cook for 3 minutes. Discard spice bag.

3. Meanwhile, prepare the canner and jars. Fill the canner about 2/3 full with water and bring to a boil. Prepare another pan or kettle with hot water in case it's needed to cover the jars once they're in the canner. Wash the canning jars, lids, and rings well in hot water. Make sure there are no chips or cracks on the jars. Keep warm.

4. Pack the hot squash into hot jars, leaving a generous 1/2" of headspace. Ladle the hot syrup into the jars leaving 1/2" headspace. Remove the air bubbles and adjust headspace if necessary. Wipe the rims of the jars. Center the lids on the jars. Screw down the band to fingertip-tight.

5. Place the jars in the canner. Ensure they are completely covered with water. Add water to the canner if necessary. Bring to a boil and process for 20 minutes. Wait 5 minutes, then remove the jars, cool, wipe clean, label, and store.

Today's bounty included:

From Underwood Family Farms: green cabbage, white cauliflower, artichokes, butternut squash, butter lettuce, romaine, mizuna, spinach, Celebrity tomatoes, easter radishes, yellow bell peppers, and Hachiya persimmons.

From Sage Mountain Farm: Fingerling potatoes, summer squash, and pie-making pumpkin.

From Weiser Family Farms: rutabagas (yum!).

From Rancho Santa Cecilia: avocados and Satsuma mandarins.

And from Silver Lake Farms: arugula, basil, and cilantro micro-greens.

Enjoy!

Shelley
Friday, October 21, 2011

Acorn Squash Ravioli


Making ravioli at home is a fun activity that you can do with friends, or with children, or on a rainy afternoon. It's actually pretty easy, especially if you buy fresh pasta sheets. Bristol Farms carries fresh pasta sheets, as do several other stores around town. For the more adventurous cook, I've provided a recipe for making your own pasta below.

For the filling:

1 acorn squash
freshly grated salt, white pepper and nutmeg to taste

1. Preheat oven to 350 F.

2. Cut the squash in half lengthwise. Scoop out the seeds. Compost them or put them in the green trash bin. Place the squash halves cut side down on a lightly greased cookie sheet and bake until soft, 45-60 minutes.

3. Remove from the oven and cool. Scoop the cooked squash into a bowl. Compost the skins or put it in the green bin.

4. Mash the squash until smooth. Season with salt, white pepper, and nutmeg to taste. Mixture should be thick.

5. Preparing the filling can be done in advance. Refrigerate the filling to use within 3-5 days, otherwise, freeze the filling until ready to use. If frozen, defrost the filling before proceeding with this recipe.

One medium acorn squash will produce a fair amount of filling. You can freeze any leftovers or turn the leftover filling into a soup by thinning it with broth.

Assemble the ravioli:

4 sheets fresh semolina pasta
Prepared filling

1. Using a hand-crank pasta machine or a rolling pin, roll the pasta to desired thickness (or thinness). [Most fresh pasta sheets are intended for lasagna or to be cut into noodles. Since ravioli has 2 layers of pasta, I like to roll it thinner, but this is a matter of preference.]

2. Starting with a sheet of pasta that's about 3-4" wide, place spoons of prepared filling down the midline of the pasta sheet, spacing them about 3" apart. Leave an inch at the top, the bottom, and on either side of the spoons of filling.

3. Fold the pasta sheet lengthwise so that the 2 long sides come together. Press down in between the filling so that the dough sticks together. Squeeze out any air so that the filling is well encapsulated. If you're having trouble getting the pasta to stick together, it helps to dip your finger in water and run it where the pasta comes together.

4. Using a knife or a pasta cutter, cut between each spoon of filling leaving enough dough on either side to create a generous edge of pasta. You can cut each piece into half-moons to give the ravioli a decorative shape.

Alternatively, you cut your pasta sheets into 3" wide lengths. Place spoons of filling 3" apart down one sheet, then cover with another sheet and cut.

5. At this point, you can freeze the ravioli for later use. To do this, arrange the ravioli in a single layer on a baking sheet and place in the freezer. Once frozen, you can pack the ravioli in a plastic freezer bag or a freezer container.

Frozen ravioli can go right from the freezer into a pot of boiling water. In fact, you don't want to defrost them, as they might stick together.

6. To cook: Bring a pot of water to a boil. Gently add the ravioli. Cook in boiling water for 2-3 minutes, or until done.

Sauces:

Acorn squash ravioli are delicious with a creamy tomato sauce. If you have any delicious home-made sauce like the Slow Cooked Tomato Sauce from Septmber 24, 2010, heat it up and stir in a little cream before saucing the ravioli.

I like to make a simple sauce using melted and lightly browned butter, ground toasted walnuts, and sage.

Omnivores might enjoy these ravioli with a classic Bolognese sauce. Whatever you decide to do, these ravioli are delicious and keep well in the freezer, so make extra to enjoy at another meal.

To make your own pasta:

Making your own pasta isn't hard, but an experienced hand produces a better result. Here's an easy recipe you can play with, if you'd like:

3/4 C unbleached all-purpose flour
1 large egg at room temperature

In a large bowl or on the kitchen counter, mound the flour and make a well in the center. Break the egg into the center of the well and begin to "scramble" the egg, incorporating a little bit of flour at a time as you continue to stir the egg with a circular motion, adding more and more flour as your go. Once the mixture holds together, you can use your hands to incorporate the flour. Knead the dough for 6-7 minutes, incorporating as much of the flour as possible. The dough will have a shiny appearance when properly kneaded. Wrap it in plastic wrap and let it rest on the counter for 30 minutes.

After 30 minutes, unwrap the dough. Pat or roll into an oblong disc. then roll into a thin sheet with a pasta machine. You may want to cut this dough in half before rolling it with the pasta machine in order to make it more manageable.

Some people prefer to use fancy durum wheat or semolina instead of all-purpose flour. These flours are wonderful and produce a more toothsome pasta, but they are also more difficult to work with.

Today's bounty included:

From Underwood Family Farms: green leaf lettuce, green bell pepper, broccoli, Cherokee heirloom tomato, golden beets, rainbow chard, Sugar Baby pumpkin, fennel, and Acorn squash.

From Weiser Family Farms: celery root.

From Rancho Santa Cecilia: mandarins.

And from Silver Lake Farms: arugula and mustard microgreens.

Enjoy!

Shelley

Friday, October 14, 2011

Risi e Bisi


Fresh peas are one of spring and fall's true delicacies. They have such a short season, you have to snatch them up as soon as they're available, because in a few weeks, they'll be gone.

Risi e Bisi, or rice and peas, is a classic Italian dish. It's a cross between risotto and a thick soup. To get the right consistency, you have to use a short grain rice. Arborio rice, or one of its cousins, like Carnaroli, is best.

You can use either home-made or store-bought chicken broth or vegetable broth. You can make a vegetable broth from the pea pods if you don't mind this extra step. Place the empty pods (after you've shelled the peas) in a stock pot. Add 2 carrots, 2 ribs celery, 1 small onion, 1/2-1 t salt, a few peppercorns, a bay leaf, and 6 C cold water. Heat it to almost boiling. Turn down the heat and simmer slowly for about 45 minutes. Cool slightly. Then strain and discard the spent vegetables.

Risi E Bisi

2 T butter
1/4 C finely chopped onion
1 C Arborio rice
3-4 C broth
1 C shelled fresh peas
salt and pepper to taste
1/4 C freshly grated parmesan cheese
chopped fresh parsley for a garnish

1. In a medium to large stock pot, melt 2 T butter. Add the onion and saute until barely translucent.

2. Add the rice and stir to coat with the butter.

3. Stir in 1 C broth. Add the shelled peas. Continue stirring until the broth is nearly all absorbed.

4. Stir in remaining broth 1/2-1 C at a time, waiting until the broth is nearly absorbed before adding the next cup.

5. Continue stirring in broth until the rice and peas are tender and the dish is creamy or even a little soupy.

6. Remove from the heat. Stir in the parmesan cheese. Season with salt and pepper to taste. Pour into bowls and garnish with finely chopped fresh parsley to serve.

Some recipes for Risi e Bisi call for a little chopped pancetta Omnivores may enjoy this tasty addition. You can add the chopped pancetta at the beginning when you're sauteing the onions in the butter.

Some folks like to garnish Risi e Bisi with finely chopped basil instead of parsley. Try it if you have some nice fresh basil.

Today's bounty included:

From Underwood Family Farms: Romaine lettuce, summer squash, leeks, sugar snap peas, bi-color corn, artichokes, jalapeno, and Sharlyn melon.

From Rancho Santa Cecilia: limes, mandarins, and Hass avocados.

And from Silver Lake Farms: mustard and arugula microgreens.

Enjoy!

Shelley