Friday, April 30, 2010

Collard Wraps

Jed digs local fruit
Walker shares loquats and nasturtium blossoms from her garden


Here's what Farmer John had for us at the Silver Lake pick-up this week:

Garlic
Beets, red and gold
Arugula
Mustard greens
Butter lettuce
Green chard
Russian kale
Collard greens
Mint
Red romaine
Chamomile

Collard greens are often prepared chopped and cooked slowly with a ham hock. This traditional preparation produces tender greens and a smoky pot liquor that's intoxicatingly delicious.

Jed suggested a completely different approach to collard greens - using them as a wrap with a vegan filling of vegetables and grains. What a great idea!

Collard Wraps

For 4 wraps:
5 medium collard leaves
2-3 T finely chopped red onion
1 C sliced mushrooms, shittake are particularly tasty
1/2 C grated carrot
1 C cooked brown rice, or quinoa, or barley
1 T canola oil
salt and pepper to taste

1. Start by selecting 4 medium collard leaves that are intact (no holes). Bring a 3-4 qt pot of water to a boil and blanch the 4 leaves, one at a time, by holding the stem and dipping the leaf in the boiling water for 5 seconds. Set aside and repeat with the other leaves.

2. Remove the stems from the blanched greens and slice them thinly. Set aside.

3. Take the remaining unblanched collard leaf: Chop the leaf in coarse strips and chop the stem thinly, same as the others.

4. In a 10-inch skillet, heat the canola oil over medium heat. Add the onions and saute until translucent, about 1 minute.

5. Add the thinly sliced collard stems and the mushrooms. Cover and turn down the heat a little. Cook until the mushrooms have exuded their moisture.

6. Add the chopped collard leaf and cover again until the it has wilted and softened somewhat.

7. Uncover the pan, turn the heat back up a little. When most of the water has cooked off, add the grated carrots and the cooked brown rice (or quinoa or barley). Cook until the carrots are slightly softened and the grain is heated through, stirring to combine. Season with salt and pepper to taste

8. Remove the filling from the heat and assemble the wraps: Take one-fourth of the filling and place it in the center of one blanched leaf. Fold the top of the leaf over the filling, then fold each side in toward the center, leaving the stem end open [or use the whatever wrapping technique you prefer]. Repeat with remaining blanched leaves and filling.

Enjoy!

Shelley

Wednesday, April 28, 2010

Beachwood Canyon Pick-up


Flat-haired retrievers enjoying organic carrots.

Here's what Farmer John had for us at the Beachwood Canyon pick-up this week:

Carrots
Beets (red and gold)
Fresh garlic
Curly Mustard
Green oak leaf lettuce
Red oak leaf lettuce
Red Romaine lettuce
Arugula
Russian Kale
Butter lettuce head
Broccoli
Oranges

Enjoy!

Tara

Monday, April 26, 2010

More Jam....


I just read Shelley's post on Loquat Jam yesterday so I thought I'd post some pics from Saturday's class, when Shelley taught us how to make strawberry jam. It was really fun. I think I'm going to grow more strawberries. I have a couple of bales of peat moss in the garage....

Speaking of fruit, I saw Jed today. After what happened to Forage, he's going to take a bit more time before he officially launches his Tree Share program. He's got some more researching to do. We're a bit confused at the moment.

We all thought that City Planning's Truck Gardening Ordinance allows gardeners in residential zones in LA City to sell their vegetables off-site. So there must be some other law at the Health Department that overwrites both the Truck Gardening Ordinance and the department of Food & Ag. Will the same kind of thing that happened to Forage over vegetables, happen with fruit even after the Truck Gardening Ordinance is officially clarified? Perhaps not if every single person choosing to sell what they grow becomes a certified producer through Food & Ag but who knows. I guess we'll soon find out.

At any rate, this movement is really shaking things up. Some things are being defined right now that are paving the way for the future. It's like we're making jam. It's 220 degrees hot in the pot, and things are starting to thicken up....

What do you want to do with all that fruit in your garden?

Tara

Sunday, April 25, 2010

Loquat Jam


If you're lucky enough to have a loquat tree, or know someone who does, you're probably knee-deep in this exotic fruit right now. Loquats are just coming into season; and they are bountiful this year (as most). If you don't have a tree of your own, the next best thing is Tree Share, Jed Lind's endeavor to make locally-grown fruit more available.

Jed had beautiful, plump loquats at the CSA pick-up in Silver Lake on Friday. He was kind enough to give me enough to make a small batch of loquat jam, one of my favorite seasonal treats. You can preserve the sweet, floral flavor of this delicious fruit by canning a few jars of loquat jam.

Prepare the fruit:
Start with about 4 lbs of ripe loquats to yield about 2 lbs of prepared fruit. Cut the loquats in half from stem to blossom end. Remove the seeds and pull off the slightly fibrous sac that surrounds the seeds. Then peel the skin off each half.** Ripe loquats peel very easily. There's no need to blanch them. If your loquats are difficult to peel, they're probably not fully ripe yet. Cut away any dark bruises and put the loquat halves in a bowl with water and a little lemon juice to keep them from turning brown.

For the jam:
2 lbs prepared fruit
4 C sugar
juice of one medium lemon

1. Chop the prepared loquats to your desired size. They don't smash up much when cooking, so make them about the size you want in your jam.

2. Put the loquats in an 8 qt jam pot with the sugar and lemon juice. Heat over medium heat, stirring until the sugar melts.

3. Bring the jam to a boil. Turn the heat down to a bubbling simmer (not a boil) and cook the jam, stirring often, until it reaches the jell point on a candy or jelly thermometer - 220 degrees Fahrenheit. This will take 60 to 80 minutes. The jam will be thick and golden in color.

4. Ladle the hot jam into sterilized jars and can in a hot water bath canner for 5 minutes to seal the jars. Or, skip the canning process and pour the jam into a jar or plastic container and store the jam in the refrigerator for immediate use. Sealed jars from a hot water bath canner may be stored on the shelf for a year or longer. Once opened, store the jam in the fridge.

This recipe will yield about 4 half-pint jars of loquat jam.

I like to add a little spice to my loquat jam. I find that cardamom pods enhance the exotic flavor of loquats. I add 8 pods and cook them with the jam until they start to open. Then I remove them (and any seeds that might have escaped), as they are hard and crunchy.

**You can leave the skins on the loquats, if you prefer. They're a little tough and don't soften substantially in the jam-making process, so if you choose to leave the skins on, chop the loquats finely for your jam.

Enjoy!

Shelley
Friday, April 23, 2010

Chard Quiche

Arugula + flowers edible too
Butter Lettuce - a shareholder fave
Jacqueline's son takes a seat on her foot

Kohlrabi - cook the tops and eat the rest raw


Here's what Farmer John had for us at the Silver Lake pick-up this week:

Wild celery (great for soups and broth)
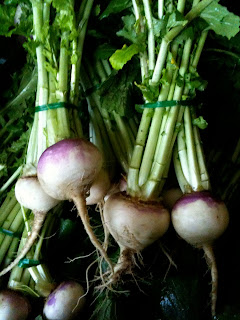
Turnips
Red and golden beets
Radishes
Kohlrabi
Fresh garlic
Arugula
Green chard
Russian kale
Butter lettuce
Red romaine
Chamomile
Oranges

Even though my garden is brimming with chard, it was delightful to see it in the CSA box again this week. Truth be told, I can't get enough of this delicious and nutritious vegetable.

Lately, I've been making chard quiches. Quiche is great at any meal - breakfast, lunch, or dinner; and you can eat it hot, room temperature, or cold. I like to make a couple of quiches at a time and freeze one for later. They re-heat nicely in the oven.

This recipe calls for chard, but you can substitute the Russian kale we got today, if you'd like. Or you can make one chard quiche and one kale quiche, or cook the chard and kale together and make two mixed chard and kale quiches. Whatever you decide, you can't go wrong with this tasty dish.

Chard Quiche

For the crust: Use the recipe below or your favorite pie crust recipe
1-1/2 C flour (I use white flour, but you can combine white and whole wheat)
1 t salt
1 stick very cold butter, cut into pieces
1-2 T very cold cream
ice water

1. Put the flour and salt in a food processor fitted with the steel blade and pulse 1-2 times to distribute the salt.

2. Add the butter and pulse until the butter is only partially incorporated and resembles a coarse meal.

3. Working quickly with the processor running, add the cream and a little ice water through the feed tube. Continue adding a small amount of water and processing until the dough sticks together when pressed between your fingers. The trick here is to process the dough as little as possible and don't let it form a ball in the processor.

4. Turn the dough out onto a floured pastry cloth. Press it together to form a ball. This recipe makes enough dough for two (2) 9-inch standard pies, so if you're making one quiche, cut the dough in half before rolling. Store the other half in the refrigerator. It'll keep for about 5 days.

5. Roll each piece of dough into a 12+ inch circle. Line two 9-inch pie pans with the dough and crimp the edges as desired. If you're only making one pie, you can freeze the rolled dough in a pie pan for later use. If you'e not saving one for later, refrigerate the pie pans with the rolled dough while you make the filling.

For the filling: This recipe makes enough filling for one quiche. Double it if you're making two quiches.
1/2 medium red onion
1 bunch chard
2 t butter
2 to 2-1/2 cups grated Swiss cheese
1 C beaten eggs (about 4 large eggs)
1 C milk
salt and pepper to taste

1. Preheat the oven to 350 degrees.

2. Slice the red onion very thinly and saute in 1 t butter until very slightly brown. Set aside and allow onions to cool.

3. Wash the chard well. Chop the green part of the chard and saute in the same pan with 1 t butter. Cover until wilted, then remove the cover and cook off any water. Season with salt and pepper. Set aside to cool. You can compost the white stalks or save them for another use, such as adding them to vegetable soup.

4. When the chard and onions are cool, mix them together in a large bowl with the grated Swiss cheese. Stir well to combine. Taste this mixture and season with salt and pepper, if you'd like.

5. In a 3 or 4 cup liquid measuring cup, beat the eggs with a fork until well mixed. Pour in the milk to make 2 C of egg-milk mixture and continue mixing with a folk until the eggs and milk are well combined.

6. Remove one dough-lined pie pan from the refrigerator and spread the chard-cheese mixture evenly in the pan. Pour the egg-milk mixture through a mesh strainer into the pan, spreading the liquid until it covers the chard and cheese. Fill to 1/4 inch below the top of the crust. [If you have a little extra egg-milk mixture, you can use it for French toast.]

7. Bake the quiche at 350 degrees for about 45 minutes or until the top is golden and the center is set. Remove it from the oven and let the quiche rest for 10-15 minutes before serving or allow it to cool completely and refrigerate for a later use.

I've used different types of milk for quiche and I've found that whole milk and evaporated milk are excellent. Two-percent (2%) works fine, too. However, skim milk does not produce a rich and smooth filling. I like to use a mixture of Swiss cheeses, too. Try your own combination of Gruyere, Emmenthale, Jarlsberg, or other Swiss cheeses.

Enjoy!

Shelley

Tuesday, April 20, 2010

Reconnecting with CSA


I'm all bundled up in my husband's giant bright red alpine weather coat, jeans filthy from this morning's job, wet from the rain. Merry Elkins, whom I haven't seen in nearly a decade (since my PR days) discovers the CSA pick-up point and asks "what's this?". OMG! It's YOU! Small world... I think Merry's joining the CSA. Cool! Funny how paths cross in life...

Later, Jodi shows me pictures of a gorgeous salad she'd made at her brother's last month. The salad was tossed with arugula flowers. She'd sent the pics to her pal, Alice Waters, who understands the beauty in such things. Alice is coming to LA on Saturday for a book-signing BTW. She is signing copies of her new book "In the Green Kitchen" at Lost & Found.

Here's what Farmer John had for us at the Beachwood Canyon pick-up today: (Thank you for taking all those bags of soil away!) You rock!

oranges (yay!)
arugula (strip the stems of leaves, flowers are edible too)
curly mustard greens (pictured above)
radishes
russian kale
green chard (see previous post for recipe)
chamomile (dry the flowers in a paper bag)
butter lettuce (peeps are loving this!)
red and golden beets
baby bok choy
wild celery
turnips (try steaming them)

Here's a recipe from Lauren at Nuttri-Savvy.

Hi Tara,
Hope the info. I sent was helpful (Calcium, Magnesium, Vit D for healthy bones). My husband - an 'intuitive chef' came up with this recipe and it's healthy & green:

Mizuna & Chard saute
(Serves 6)

1 bunch of mizuna
1 bunch of green chard
1 young garlic clove minced
1.5 TBS olive oil
1 tsp apple cider vinegar
1 medium turnip shredded

In a large pot saute young garlic in 1 TBS olive oil, add mizuna and chard and cook until just tender. In a processor, shred turnip. Add cider and a half TBS of olive oil. Plate mizuna and chard with shredded turnip mixture on top. Enjoy a healthy, delicious serving of leafy greens.

Nutritional info: cal 70, fat 3.5g, sodium 350mg. carb 7g, fiber 3g, protein 3g

Sincerely,

Lauren O'Connor, MS, RD
Registered Dietitian


Thank you Lauren,

Tara

Saturday, April 17, 2010

Chard and Eggs

Chard is a great vegetable. It's easy to grow and grows practically year-round. Beginning gardeners can get a lot of satisfaction from a few chard plants. Chard comes in several varieties, most commonly green and red. The red, with its magenta spines and veins, is both beautiful and tasty.

Chard is very easy to cook and can be a slightly more substantial substitute for spinach in many recipes. I like to simply chop and saute chard in a skillet with a small amount of butter over low heat. Cover the skillet until the chard is wilted, then remove the cover, turn up the heat, and cook off the liquid. Be sure to rinse the chard well to remove any grit before cooking. There's no need to dry it, though. Just chop it and pop it in the pan. You can cut off and compost any woody parts of the stems, or feed them to the chickens - they seem to love chard. Add and little salt and pepper to your cooked chard and you've got a simple and tasty side dish.

If you want to get fancy, you can start by sauteing a little red onion or green garlic before sauteing the chard, as chard goes well with both of these flavors.

Once you've sauteed the chard you can make a lovely meal by topping it with a poached or fried egg. Omnivores might enjoy including a slice of cooked ham or crumbled bacon.

Another way to eat chard is with scrambled eggs. Once the chard is cooked and liquid has cooked off, scramble some eggs in a bowl and add it to the hot skillet. Turn down the heat and stir the eggs with the chard until done. Season with salt and pepper. You can make this dish much richer by adding a little cream cheese or goat cheese chopped into small chunks just before the eggs are done. Stir in the cheese until it gets warm, but don't let the cheese melt entirely. Maintain the integrity of the chunks.

Chard is wonderful in quiche, too. Check out our Silver Lake Farms cooking classes where we'll be making chard quiche.

Enjoy!

Shelley

Friday, April 16, 2010

Lugging Digging Buddies at the pick-up today!

It really felt like community supported agriculture day today. Wonderful people chipped in to help unload, lug and set out today's crates of fresh veggies and greens, ready for shareholders to collect from Farmer John's morning harvest. I was so wrapped up in the moment, I forgot to get my phone out to snap the scene but here's a shot from last week, when the ladies swooped in to help just as I was about to collapse over another 60lb crate of turnips.


THANK YOU EVERY SINGLE KIND SOUL - YOU KNOW WHO YOU ARE

It's really amazing how farming brings people and communities together. While CSA shareholders lugged heavy crates full of vegetables, Molly and Alex, volunteers, bagged up the soil we'd dug out from the side lawn, where the CSA pick-up is. They bagged up 2 yards of soil, maybe even 3. That's a big pile of soil! Farmer John is going to take it away for us.


(The soil had come from where we'd built two community raised beds with financial support from the Archer School For Girls. We'd dug out a foot layer of soil, built the beds and filled them with a clean mix of organic soil, composted horse manure, sand and worm castings to a depth of two feet. I threw in some endomycorrhizal fungi for bacterial good measure. Veggies love it! Young ladies from the school, and their wonderful teachers, planted the raised beds with veggie seedlings last month.)

Shareholders passing by on their way to pick-up, chipped in to help Molly, Alex and I dig and bag until sunset. Chris Murakami, cycling past to pick up for the first time, pitched in to help with Stacey, who was there picking up for a friend. We met, dug, bagged and talked about how Chris was going to use his veggies the following Tuesday in class. Storing his greens is going to be important. Everything needs to be fresh and crisp for Chris' class on Tuesday, when he's planning to teach his students about food - where it comes from, how its grown and why local, fresh, organic produce is good. There are so many people out there doing good work like this.

We scraped clods of wet soil off each other's shoes.

Past 7pm, our friends "the lads," helped Molly and I load my van with the empty crates and boxes. Lads, if you're reading this, Thank You! That was a really nice thing you did ...

Molly's husband, Clay, and shareholder Dan, helped Molly and I wrap up bagging soil.

Molly, you are REALLY loved! Thank you so much for all your hard work!

Here's what good 'ol Farmer John had for us at the Silver Lake pick-up today:

(off the top of my head because my brain's exhausted, my back aches and I can't find the list)

celery
russian kale
arugula
mizuna (in the mustard family, lovely raw in a green salad)
turnips
butter lettuce head
red leaf lettuce head
chamomile
fresh garlic
baby bok choy
beets

I feel like I missed something out. Let me know if I did.

Have a happy, relaxing weekend. Thanks everyone for helping so much today.

Tara

Tuesday, April 13, 2010

Beachwood Canyon + Kale Chips


Heather and her girls at pick-up


Russian Kale

Dear Tara,

We absolutely love our Tuesday Veggie pickups. I do have to admit that sometimes all these gorgeous vegetables are a bit daunting. I successfully made it through nettles: soup, pesto, tea, steamed...

My most recent challenge is KALE. I know that it's one of the healthiest vegetables around, loaded with Vitamins A & C and calcium and iron. Here's a way to make them crunchy, salty and still healthy!

KALE CHIPS

Generously drizzle chopped leaves with olive oil.
Roast at 350 degrees until crispy (15-20 minutes).
Sprinkle with sea salt.

Thank you for enhancing our lives,
Mary Kay Patrick

Thank you Mary Kay!

Here's what Farmer John had for us at the Beachwood Canyon pick-up today:

Red leaf lettuce
Butter lettuce
Arugula + flowers (edible flowers make a lovely garnish for salads)
Fresh garlic
ORANGES - yay!
Beets
Russian Kale
Baby Bok Choi
Turnips
Celery
Green Chard

Enjoy!

Tara

Monday, April 12, 2010

Minted Quacamole

Hey Tara,

Been meaning to write this quick note to you before Round 2 began to say how life-enriching (not to mention taste bud-enriching) the Beachwood Canyon CSA program has been for me and my family. Tuesdays have become quite the event, chasing our four-year-old, empty shopping bags waving in the wind, over to your makeshift stand each afternoon and seeing the look of delight on his face every time Farmer John's bounty includes his faves--carrots, celery, cucumber and/or broccoli.

Can't wait to see what the spring session brings!

In the meantime, I've forwarded this tasty little recipe (originally from a Canadian food and drink magazine) that makes good use of a couple of this past week's items.

Bountifully yours,

Mike, Kim & Nicky

MINTED GUACAMOLE

2 ripe avocados
2 tbsp lime juice
1 green onion, thinly sliced
1/4 tsp. salt
1/4 tsp. ground cumin
2 tbsp chopped fresh mint

1) Mash peeled, pitted avocados, leaving some chunkiness. Stir in remaining ingredients until combined. Serve with tortilla chips.

Friday, April 9, 2010

Chamomile Shortbread


Shareholder Mark enjoying the fragrance of fresh chamomile


You can make a lovely tea from fresh chamomile flowers, but if you take the time to dry them, you can crush the flowers to a fine powder and add it to a variety of baked goods, conveying chamomile's subtle floral flavor with a hint of apple to your favorite cakes, cookies, or muffins.

It's easy to dry the flowers. Simply pull them off their stems. Compost the stems. Leave the flowers out to air dry for a couple of days, then store them in a glass jar or a paper bag.

To use chamomile in baked goods, it's best to pulverize the flowers. Use can do this in a mini food processor or a clean coffee grinder. You can also use a mortar and pestle. The flowers are soft and will crush easily when dry.

I added some pulverized chamomile flower powder to my favorite shortbread recipe to delightful results.

Chamomile Shortbread

1 C unsalted butter, room temperature
1/4 C powdered (confectioner's) sugar
1/4 C granulated sugar, plus 1 T for sprinkling on top, if desired
1 t vanilla extract
1-1/2 C flour
1/4 t salt
3 T pulverized chamomile flower powder

1. Preheat oven to 300 Fahrenheit.

2. Cream butter with an electric mixer until fluffy and pale yellow.

3. Add 1/4 C powdered suger and 1/4 C granulated sugar. Continue beating until granulated sugar is completely incorporated and mixture is not gritty.

4. Beat in vanilla.

5. Sift together flour, salt, and pulverized chamomile flowers and add gradually to the butter mixture until just blended.

6. Using floured hands, press the mixture into an ungreased 9-inch square cookie pan. If desired, sprinkle top with 1 T granulated sugar.

7. Bake about 1 hour, until the edges of the shortbread are just slightly golden.

8. Remove from the oven and immediately cut into 3" x 1" strips. small triangles, or whatever shape you wish. Allow the shortbread to cool in the pan before removing the pieces.

You can use dried chamomile flowers in many recipes. However, chamomile's flavors are subtle, so pick recipes that have simple flavors, or substitute chamomile for other spices or flavorings. Try it in corn muffins or yellow cakes.

Enjoy!

Shelley

Spring Bounty


Where your arugula comes from - arugula field chez Farmer John


Where your broccoli comes from, chez Farmer John


Mizuna above


What a bountiful box we had in Silver Lake today! Here's what Farmer John had for us:

Turnips
Avocados
Garlic
Beets
Mizuna
Arugula
Kale
Butter lettuce
Adolescent romaine and oak leaf lettuces
Mint
Baby spinach
Chamomile
Radishes

Jed Lind also brought tangerines and loquats to share with shareholders.

I'll post a recipe soon. In the meantime, make a lovely fresh salad with a combination of greens: mizuna, arugula, a little of each of the lettuces and a chiffonade of 4-5 mint leaves. Dress it lightly with your favorite flavored vinegar and olive oil, add a little salt and pepper, and enjoy the taste of spring.

Wednesday, April 7, 2010

My friends give me poop


Molly says I say poo a lot. It's true; I can't help it. Horse poo, worm poo and now rabbit poo.

Thank you Ann!


(And in case my neighbor is reading this, I placed the poo in City approved compost bins. This makes it legal for me to compost stuff I did not generate on our property. Frank: dude, you gotta stop taking pictures of me and anyone who comes to my house! So rude! And very creepy....)

Tuesday, April 6, 2010

Round 2 - Beachwood Canyon

Here's what Farmer John had for us at the Beachwood Canyon CSA pick-up this week:

Beets - golden and red
Arugula
Broccoli
Baby spinach
Oak leaf lettuce mix
Fresh garlic
Radishes
Cilantro
Chrysanthemum leaves (see March 23 blog for recipe from Shelley)
Chamomile for tea
Russian Kale
Butter lettuce head
Mint
Avocados - yay!

Our first fruit! Avocados! Thank you Farmer John!

Monday, April 5, 2010

Zen's Spicy Green Rice Recipe

Hi Tara

Thank you for all the wonderful goodies today.
Here is a recipe that we used your cilantro for.

Thank you!
z & b

Spicy Green Rice

Makes 6 servings

6 cups — cooked warm Jasmine Rice ( 2 1/2 cups uncooked)
1 cup — finely chopped cilantro
1 1/2 cups — chopped green onions
1/4 cup — finely chopped jalapenos (less or more depending on how spicy you like it)
1 cup — cooked and drained green peas
3 tbsp — olive oil
1 tbsp — sesame oil
2 tsp — salt
Black pepper to taste
Juice from 1 or 2 limes depending on size and juiciness


Place cooked rice in a large bowl and add ingredients and gently mix!

So easy! Thank you Zen! Tara

Plant Sale at Raymond Ave Neighborhood Garden

Julie Burleigh, Manager of the Raymond Avenue Neighborhood Garden sent this is:

~~~~~~~~~~~~~~~~~

PLANT SALE & CELEBRATION!

~~~~~~~~~~~~~~~~~

The Raymond Avenue Neighborhood Garden is Celebrating its 2nd Year!

Sunday, April 11th

11:00 – 2:00 in the Garden

2632 S. Raymond Ave., 90007

~~~~~~~~~~~~~~~~~

*Vegetable seedlings, herb seedlings & flowering plants being sold at great prices!

*Amazing bread by Bicycle Bread Bakery!

*Pickling demonstration by Jen Smith of Full Moon Pickles and Preserves!

*Master Gardeners on hand to answer your toughest gardening questions!

*Lots of great food made by our amazing gardeners!

This fundraiser event benefits the garden located in West Adams, just west of USC.

Friday, April 2, 2010

Pan-Fried Turnips

Turnips

Russian Kale - great sauteed
Farmer John (above) looking dapper at market today with
Sabrina, whose helping get the farm ready for visitors...


Shareholder Kress and vollie Jed at the pick-up today

Chrysanthemum leaves - see Tuesday,
March 23 post for recipe with sesame oil.

Here's what Farmer John had for us at the Silver Lake pick-up this week:

Turnips
Red and golden beets
Broccoli (with its tasty leaf)
Russian kale
Arugula
Adolescent red and green romaine
Butter lettuce
Chrysanthemum greens
Green garlic
Cilantro
Dill

Roasting turnips is such a snap it's easy to forget that there are many other ways to prepare this delicious vegetable. Pan-frying is about as easy as roasting and can produce a lovely crisp and brown exterior full of complex flavors.

Start by removing the greens. Compost them or save them for another use. Peel the turnips, but don't be daunted by their pungent aroma when raw. Turnips are mild and delicately flavored once cooked. Cut the turnips into bite-sized pieces.

Heat 1 T olive oil in a heavy skillet with a cover. I like to use a cast iron pan with a glass cover that fits snugly. Add the turnips and season with salt and pepper to taste. Toss to coat lightly with the oil and cook over medium heat, stirring once or twice, until the turnips well-browned and soft, about 10-20 minutes depending on the size of the pieces.

Three small turnips will make a small side dish for two people. However, since turnips keep so well in the fridge, you might still have your turnips from two weeks ago, so go ahead and double this recipe.

If you have only three turnips, you can expand this recipe by combining the turnips with potatoes. I like to use baby Yukon Golds, Fingerlings, and/or Peruvian Blues. Use an equal amount of potatoes, cut them about the same size (no need to peel the potatoes), and put the potatoes on a few minutes before the turnips because they take a little longer to cook.

If you happened to pick-up a couple of mandarin oranges a share-holder brought in today, consider topping your pan-fried turnips with a little finely grated mandarin orange zest. Or snip a little of Farmer John's fresh dill over your turnips before serving.

Enjoy!

Shelley